11 cool things Copilot can do in Excel
Microsoft has woven its generative AI technology throughout Microsoft 365, the company’s productivity suite. Its Copilot AI assistant is most often used in M365 apps for text-oriented actions, such as generating email or document drafts in Outlook or Word, or writing summaries of Teams meetings.
In Excel, of course, Copilot’s primary uses lean toward calculations and data analysis. It can also help you style or edit a spreadsheet. This guide goes over some of the most useful actions that Copilot can take on your spreadsheet in Excel.
How to get Copilot in Excel
Copilot AI tools are available in the Excel web and desktop apps.
The cheapest way for individuals to get them is to subscribe to a Microsoft 365 Personal plan for $10 per month. A free first-month trial is available.
Copilot tools for Excel are not included with Microsoft 365 business plans; to get them, your company has to subscribe to a separate Microsoft 365 Copilot plan. Large organizations must subscribe to the standard M365 Copilot plan, which costs $30 per user per month. Organizations with fewer than 300 employees can opt for the M365 Copilot Business plan at $21 per user per month. A free first-month trial is available.
Prepare your spreadsheet for Copilot
For Copilot to perform actions to your spreadsheet, it must be an .xlsx file and stored in your OneDrive or SharePoint. AutoSave must be turned on if you’re using the Excel desktop app.
The data in your spreadsheet should be organized in a table. This isn’t absolutely required, but Copilot will likely provide better results.
If there’s data in your spreadsheet that’s not in a table, select the cells, and then select Insert > Table on the ribbon toolbar above your spreadsheet.
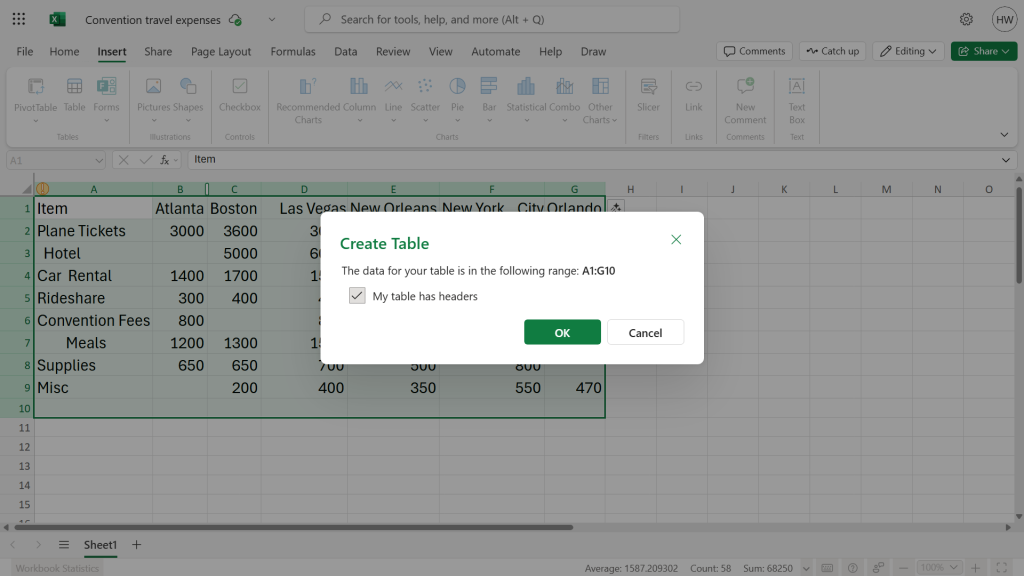
For best results with Copilot in Excel, put your data in table format.
Howard Wen / Foundry
How to use the Copilot sidebar in Excel
You execute the actions described in this guide by typing in the Copilot sidebar. Click the Copilot icon at the far right of the Home tab on the ribbon toolbar, and the Copilot sidebar will open along the right. Then you type your prompt (request for action) inside the chat box or choose one of the suggested prompts that appear below the chat box.
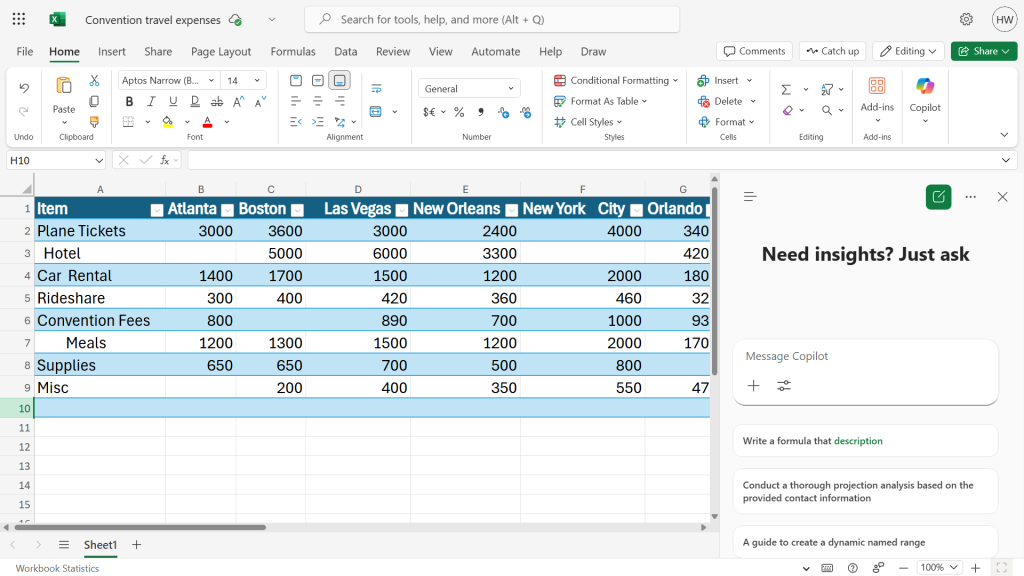
Click the Copilotbutton in the toolbar to invoke the Copilot sidebar.
Howard Wen / Foundry
After Copilot processes your prompt, it’ll generate a result that appears in the sidebar. You can type an additional prompt to coax the AI to fine-tune this result.
Turn on Agent Mode for more Copilot powers
Copilot in its default mode cannot make changes directly to your spreadsheet. But you can allow it to do so by activating a feature called Agent Mode.
Open the Copilot sidebar. Below the text entry box, click the Tools icon (it looks like two slider controls) and select Agent mode.
Enable Agent Mode for advanced Copilot features in Excel.
Howard Wen / Foundry
Now you can enter many of the prompts described below that allow Copilot to add elements and make edits to your spreadsheet.
How to write prompts for Copilot in Excel
In the Copilot sidebar, you type a prompt into the text entry box. A prompt is written as if you’re chatting with the AI, telling it to perform an action to your spreadsheet.
Type in the action you want Copilot to take
Howard Wen / Foundry
Your prompt to Copilot can be brief or consist of a detailed sentence or more. There are no hard rules. But here are two things to keep in mind for wording an effective prompt to Copilot in Excel:
- Describe exactly the action that you want Copilot to perform to your spreadsheet.
- Specify the cell, cell range, columns, and/or rows that you want Copilot to perform the above action to.
With those basics out of the way, let’s look at how Copilot can help you work with your data.
1. Clean up your spreadsheet
In Agent Mode: If you’re editing a spreadsheet that you didn’t create, or one that was imported from another file format, you can have Copilot clean it up. This can include removing duplicate columns or rows, or extraneous spacing in cells. Examples:
- Delete two or more spaces in cells.
- Highlight cells with missing values.
- Convert all number values in cells to US currency format.
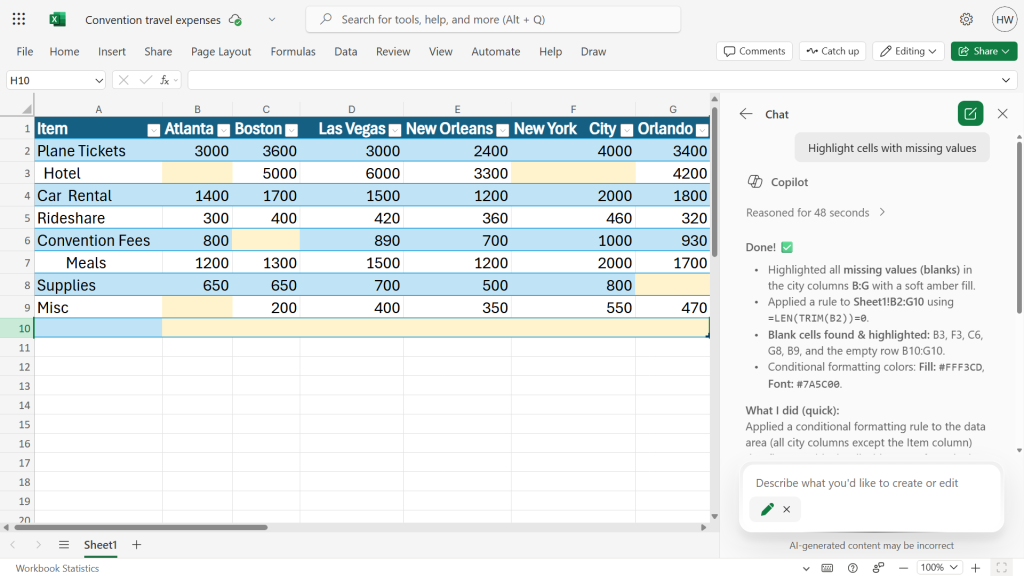
Copilot takes action on your data and tells you what it did.
Howard Wen / Foundry
2. Create new columns or rows that contain values
In Agent Mode: You can prompt Copilot to generate a column or row that contains new values in its cells, such as numerals, currency, or dates. You can provide a title for the new column or row.
Copilot can also organize the existing values from specified cells into a new column, row or table. In your prompt, specify the cell range, column, or row that you want copied into a new column, row, or table.
- Add a column with the heading “San Francisco” and fill its values with “100”.
- Copy the values of “Plane Tickets” and arrange them in a new column on a new sheet with each corresponding city in its own row.
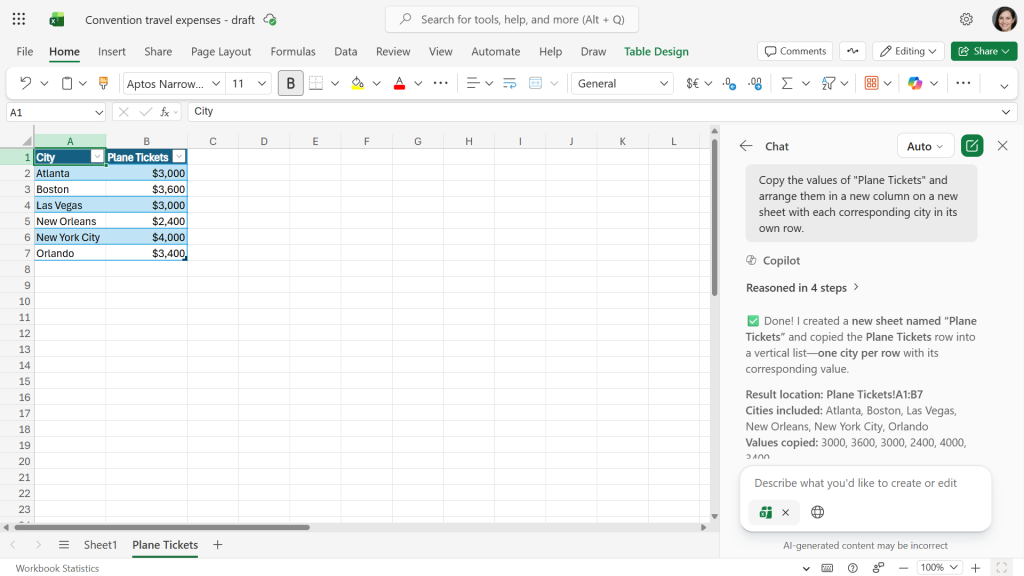
Copilot has generated a new table with the data from the “Plane Tickets” row, arranged as described in the prompt.
Howard Wen / Foundry
3. Create pivot tables
In Agent Mode: First, select a cell range, columns, or rows in your table. Then type a prompt instructing Copilot to create a pivot table from the selected cells. (Or, if you don’t manually select them in the table, you can list the cell range, columns, or rows in your prompt.)
- Create a pivot table for Column B.
- Analyze Plane Tickets and Hotel and present as a pivot table.

Copilot can quickly create a pivot table from specified source data.
Howard Wen / Foundry
4. Apply conditional formatting to your tables
In Agent Mode: If you’d rather not have to design every little aspect of your spreadsheet, you can prompt Copilot to apply conditional formatting to a table. It can suggest which cells to apply conditional formatting to and their colors.
- Suggest conditional formatting for this sheet.
- Apply conditional formatting to values greater than 1000.

Here Copilot is suggesting a heatmap color scheme for the data.
Howard Wen / Foundry
Remember that you can always type follow-up prompts. For example, if you like the heatmap formatting shown in the screenshot above but want to reverse the color scale (using red for higher values and green for lower), just type that into the chat box and Copilot will comply.
5. Create charts and graphs
In Agent Mode: Select a cell in the table; you don’t need to select the entire table. Or you can select specific columns and rows if you want these turned into a chart or graph. Then type your prompt telling Copilot the chart type that you want (bar chart, line graph, etc.). You can reference the columns and rows that should be used for it, if you didn’t already select these on the table.
- Create a pie chart for Column C.
- Create a bar graph that compares the Items for Las Vegas, New Orleans and Orlando. Add this graph to a new sheet.
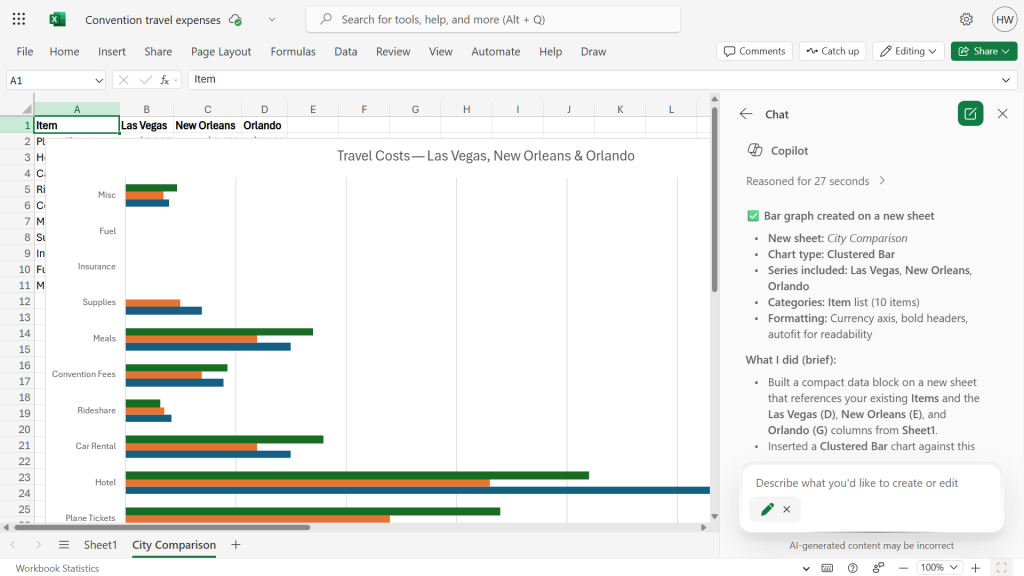
Using Copilot to create charts and graphs is a big timesaver.
Howard Wen / Foundry
6. Explain how a formula works
In Default Mode: If you’re using a spreadsheet that you didn’t create and don’t understand how a formula in it works, ask Copilot to give you a breakdown of its function.
Even if you’re building your own spreadsheet or modifying one, this Copilot ability can help you check the status of a formula or explain why it’s not working. It can also teach you to use a formula that you’re not already familiar with.
- Explain how the formula in F12 works.
- Explain why the formula in C12 is not working correctly.
Copilot can explain formulas to you.
Howard Wen / Foundry
7. Create a formula based on your description
In Default Mode: You can ask Copilot to generate a formula customized for you. In your prompt, describe what you want a formula to do to the values in a cell, cell range, column, or row.
- Create a formula that totals the values in Row 4, 5, and 10.
- Write a formula that calculates an extra 20% for each city in Row 7.
If you’re not sure how to write a formula, just tell Copilot what you want the formula to do.
Howard Wen / Foundry
8. Summarize your spreadsheet
In Agent Mode: Copilot can analyze your spreadsheet and summarize its purpose, and maybe even provide insight on its current data. This can be used to understand an unfamiliar spreadsheet that someone has shared with you, or to check the progress of tasks in a project management spreadsheet.
You can specify in your prompt the style of the summary, such as asking Copilot to word it in a detailed financial manner or as goal-oriented steps.
This summary will be added as a new sheet.
- Summarize this in an itinerary format.
- Summarize this by cost breakdown for formal financial review.
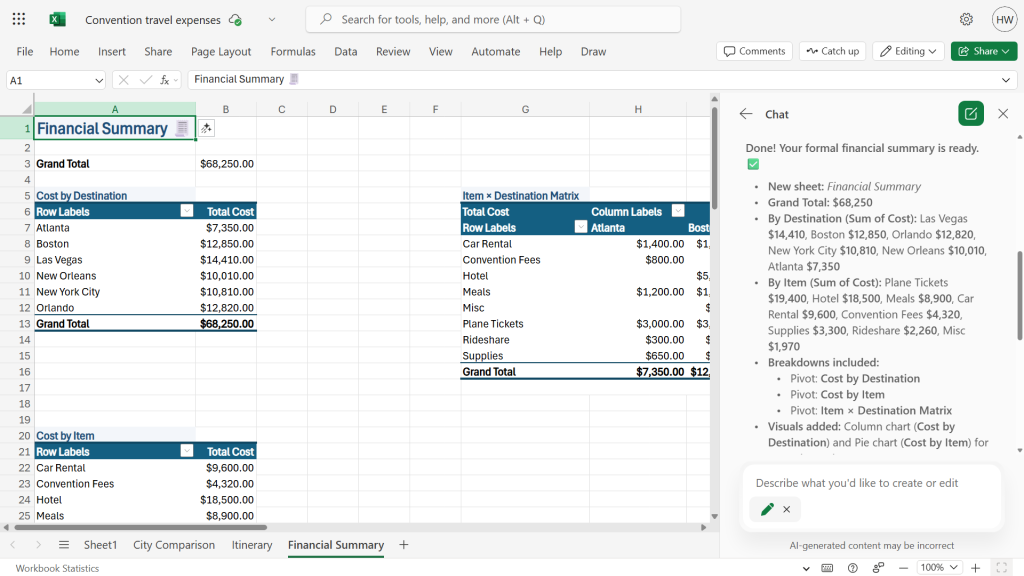
Copilot can summarize spreadsheet data.
Howard Wen / Foundry
You can prompt Copilot to generate a summary to be used in a new email. Copilot will provide a link on your spreadsheet — clicking it will open a new email draft in Outlook that includes this summary.
- Summarize this for an email draft with a link to open it in Outlook.
It can then create an email draft highlighting the summary findings.
Howard Wen / Foundry
9. Look for trends or any unusual values
In Default Mode: Copilot can point out data it sees that stand out in your spreadsheet. You can use this to spot trends that you may not have noticed.
Alternatively, this Copilot ability can help you edit your spreadsheet, by finding possible errors or unusual values in cells. If you’re collaborating with co-workers on a spreadsheet, you can prompt Copilot to check for changes that appear unusual.
- Spot any outliers or trends among the values in the cells.
- Find any errors and make suggestions to correct them.
Copilot might find trends or errors in your data.
Howard Wen / Foundry
10. Calculate hypothetical projections
In Agent Mode: You can prompt Copilot to model new calculations when the values in a cell, cell range, column, or row are changed. Using Copilot like this can be a handy way to experiment with what-if scenarios.
- Recalculate each value in every cell at 80%.
- Calculate all Items for New York City with an additional $200 for each Item, and set these results in a new table on a new sheet.
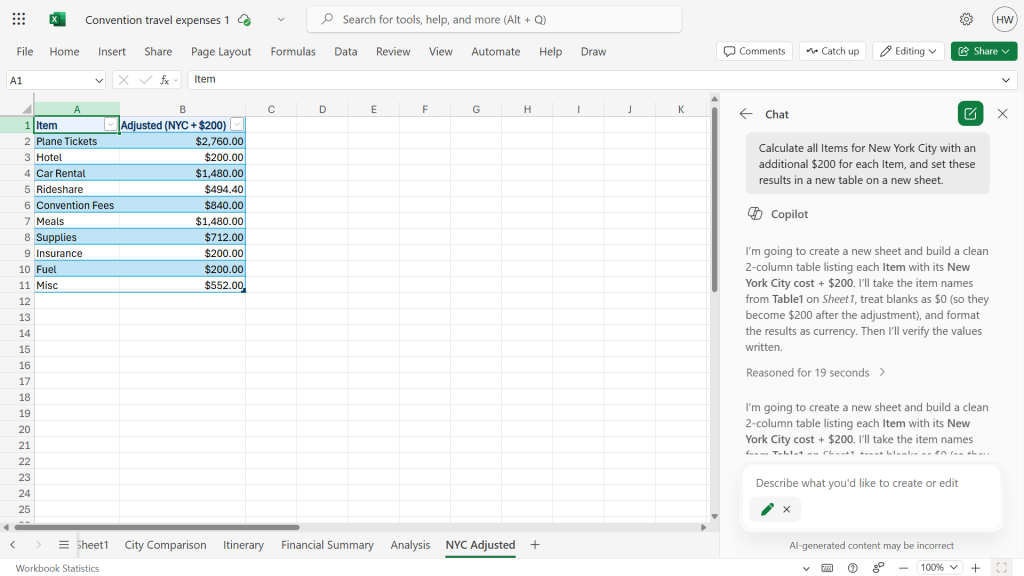
You can use Copilot to create what-if scenarios.
Howard Wen / Foundry
11. Embed Copilot functionality in a cell
In Default Mode: Using Excel’s new COPILOT function, you can insert a formula into a cell that executes a prompt for Copilot to generate text or values. The result will display on your sheet, starting from the cell that contains the formula. Whenever the values in the cells referenced by the formula are changed, Copilot will update its generated result.
This is the format of the formula that you enter in a cell:
=COPILOT(“Your prompt here”, A1:D10)
Type your prompt inside the two quote marks. Follow it with a comma and the cell number or cell range that you want Copilot to apply your prompt to.
- =COPILOT(“Summarize”, B2:G2)
- =COPILOT(“analyze”, B7:G7)
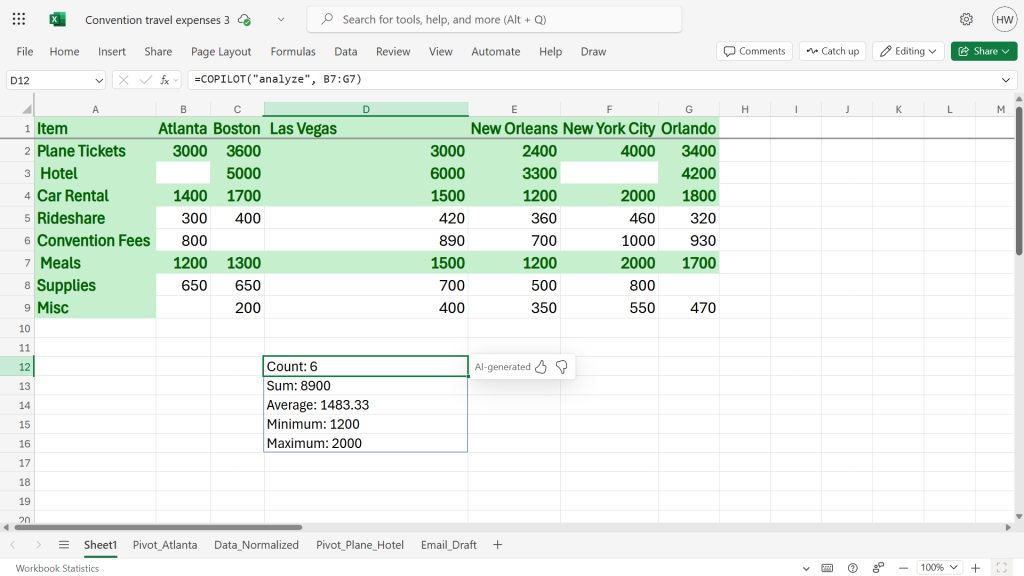
Cell D12 and below shows Copilot’s analysis of the data in cells B7 to G7. If those source values change, Copilot’s analysis is updated as well.
Howard Wen / Foundry
Related reading:
- Microsoft Copilot can boost your writing in Word, Outlook, and OneNote — here’s how
- Excel basics: Get started with tables
- How to use PivotTables and PivotCharts in Excel
- Excel basics: Get started with charts and sparklines
- How to use Excel formulas and functions
- How (and why) to use conditional formatting in Excel
- More Microsoft tips and tutorials
Read more: 11 cool things Copilot can do in Excel